
Hello Stampers,
For today I have lots of tips for the Happy Dies. Warning before you start reading our looking at all these pictures. This post is on steroids. I coulda split these into a few different posts but I have so much that I want to share with you all. A new catalog just around the corner (in January) that I decided to post it all at once. The video is also longer than my normal video it is jam pack with lots of tips for this fun Happy die.
The video can be view below or view it on my YouTube channel.
Happy Dies With Layers
This set of cards are all layers on the card base. The top layers are the Plaid Tidings designer paper.
Measurement
- Card base 11 x 4¼ score at 5½ or 8½ x 5½ score at 4¼
- Color Layer 5¼ x 4
- OPTIONAL extra layer 5-3/8 x 4-1/8
- Designer paper 5-1/8 x 3-7/8 OR 5 x 3¾ (this will give you a wider frame)
- Scrap for elements and labels


In this one, I use the extra layer. Card base Whisper white, layers in order Garden Green, Cherry Cobbler, and Plaid Tiding designer paper. All is explained in the video on how to die cut so you have the perfect match for the diagonal paper. Trust me you will be amazed by the tips that I share how simple it is to have perfect diagonal layers.


Color on this one is Crumb Cake, Cherry Cobbler, and the trees are die-cut for the Pines Wood die set.


I just love this white and black plaid print with the bright Daffodil Delight. The Daisies are with the medium daisy punch. Card base Wisper White, Layers Daffodil Delight, and Plaid Tiding designer paper. Also, the black layer in the back of the Happy is the Plaid Tiding all shown in the video. So many great tips in the video. Yes, it is a long video but it is jam-packed with many tips that you don’t want to miss any of them!


Happy Die Cut On Card Base For A Window View
This next batch of cards I call it the window view. The Happy is die-cut on the card base so it is like a window you can see the inside of the card through the Happy opening. How to die cut again it is all in the video and how you get the perfect match layer.

Measurements
- Pretty Peacock 8½ x 5½ score at 4¼ card base
- Forever Greenery 5¼ x 4
- Whisper White 5¼ x 4 inside
- Pretty Peacock about 6″ adhere with tear and tape


Check these fun clouds. So simple to make a temple with one of the dies in the Happy Die set. I sponged with Balmy Blue ink, and the bottom I sponged with Pear Pizzazz.
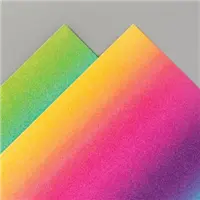
Card base Whisper White 11 x 4¼ score at 5½. Rainbow Glimmer paper 4¼ x 1½ for inside and scrap for balloon and strings.


Inside I stamped the balloons with Melon Mambo and Blackberry Bliss. Another tip in the video for these balloons.
Triple Happy
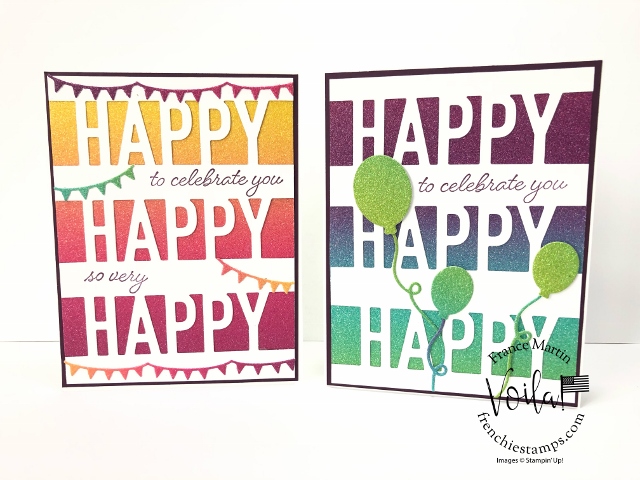
Can you tell I been having lots of fun with this die set? The triple happy is simple first die cut the happy at the top about ¼” from the top, repeated at the bottom and last center in the middle of both of them.
Measurements
- Whisper White 8½ x 5½ score at 4¼ card base, 5¼ x 4 the “Happy” layer
- Blackberry Bliss 5-3/8 x 4-1/8
- Rainbow Glimmer Paper 5¼ x 4 and scrap for the balloons and banners.
Ink color is Blackberry Bliss.


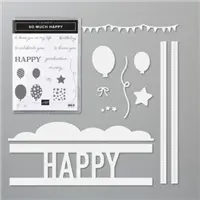
The Happy Showcase

This is a set that didn’t get my attention at first. Long story short is, I order it by error, well it was a great error because I love every card that I created with this set.
Tip Video
This video is longer than my typical video but trust me it is loaded with lots of great tips.
Supplies for today project
You can purchase all of the supplies used for today’s cards by clicking on the product images below ↓ or you can click ADD ALL to Cart, this will add all the supplies to your shopping cart. Then you can remove the items you do not need. The ADD ALL to Cart Option makes it easier and you will not have to go back and forth to my page.
Don’t forget to EDIT your cart as needed. If you need additional items, you can also click continue shopping and add them to your order as well.
Thank YOU for your support and business.


Customer Appreciation
 All orders of $40.00 or more before tax and shipping placed on my online store with Hostess Code NZEXSDKM will be qualified for this month’s project download. The PDF’s are design by Frenchie’s Design Team. This month I “Frenchie” designed the cards.
Order of $40 or more before tax and shipping with the hostess code you will receive the PDF by email.
This month’s PDF includes 9 cards (3 simple cards and 6 fun fold cards) Showcasing 3 designer paper the In Good Taste, Forever Greenery, and Peony Garden.
PDF includes all measurement, step by step instruction, supplies list, individual pictures.
All qualified orders will receive the download by e-mail in less than 48 hours, from the time the qualified order is place. CLICK HERE to shop with me.
 Order of $25 or more before tax and shipping on my online store using the hostess code ATWDDDJA will receive a pack of Adhesive-Backed Snowflakes (these will be mail from my house on Jan. 2nd with a thank you card).
Note if your order is $65 and above before tax and shipping you will receive the PDF download also.
If your order is over $150 DO NOT enter the hostess code and you will get all the stamping rewards and I will send you the PDF by e-mail.
Don’t forget about my “Frequent Buyer Rewards Program” Track your purchase and earn a free stamp set of your choice, or Sponge Dauber Case. For all detail and track sheet CLICK HERE. You are responsible to track your own purchase.
Slim Shadow Box with the Happy Die
About once a week I go live on different days at lunchtime on YouTube and this is one of the cards I did a few weeks ago the Slim Shadow Box Card. If you miss this video CLICK HERE to watch the replay.
YouTube doesn’t send a notification for schedule videos but it still sends a notification for live videos. Make sure to subscribe to my channel HERE and also click on the little bell to get a notification when I go live on Youtube.


Have a lovely day!

The greatest compliment you can give me is a referral to a friend.


Awesone!!!
That was so helpful! Thank you!
Fantastic! Great ideas! I love it! Thank you for sharing! 🙂