
Hello Stampers,
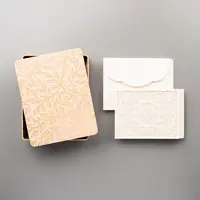
The pretty Bird Ballad Laser Cut card for today. If you love detail you sure gonna love these detail card with the pretty scalloped envelops. Plus they come in a cute metal tin. See page 168 of the annual catalog or above in the picture you can see all.
I have a a video to share how simple it is to add any color cardstock inside the card. This is awesome, you can add any color of your choice and it look like you have a variation of color card but all come from the same card base just a different insert.
The video can be view below or on My You Tube Channel.
Color inserts

I did 3 super quick card in different color to show you how the colors change the look of these cards.
The card above the insert is Seaside Spray. The front I only hand cut some of the bird from the Bird Ballad designer paper and Voila the card was finish. Quick and simple but so detailed. In all the 3 that I share today I think this is my favorite pick. What is your favorite?

For this one I use the Crushed Curry. I added a a 5 x 1 strip of very vanilla then the 2¼ basic black and 2″ very Vanilla circle. To jazz it up a little more I added the Flower Faceted Gems.

Insert Measurement
For the color insert I suggest to cut the card stock just a little smaller then the front of the card base.
The size of card front is 5½ x 4¼. To give the space for the fold, I cut mine at 4-1/8 x 5-15/16. For the 4-1/8 that is in between 4 and 4-1/4. I bet I scare you with the 5-15/16. Well to make it easy just place the cardstock just above the 5½ mark, so it just one little hair shy of the 5½. The reason for a little shorter on the width it make it easier to adhere to the inside of the card base and not sticking out.
I understand that measurement is difficult for many so I have a video to help you all with measurement. That video was part of my series of Stampin’ 101 way back in 2014. If you wish to view the video CLICK HERE. I think that video will help many understanding all the measurement.

Here the insert is Early Espresso. The stamp set is To a Wild Rose. Stamp in Bermuda Bay for the flower and Old Olive for the Leaves.

These 2 picture you can see that the top one I adhere all around the insert. Below I only adhere the insert at the top this is much easier to adhere just the top. In the video I have many tips on how to adhere the insert.

Tip Video
Supplies for all 3 cards
You can purchase all of the supplies I used for today project by clicking on the product image below ↓ Thank YOU for your support and business.


Customer Appreciation
 All order of $50.00 or more before tax and shipping place on my online store with Hostess Code KEUZBSEZ will qualified for this month projects download.
The PDF’s are design by Frenchie’s Team and the Passport Pals.
If your order is between $40 to $49 and you enter the hostess code you will received only one PDF, the one design by Frenchie’s Team.
This month PDF include 13 cards and one apple box.
PDF include all measurement, instruction, supplies list, individual pictures.
All qualified order will receive the download by e-mail in less then 48 from the time the qualified order is place. CLICK HERE to shop.
If your order is over $150 DO NOT enter the hostess code and you will get all the stamping rewards and I will send you both PDF.
Have a lovely day!


I love love love this laser cut card. Thank you for the video. Love the darker background color as it shows off the laser paper better. Thanks for the video.