
Are you in need of quick Holiday cards? If so, the Evergreen Forest Embossing On Foil Paper sure is pretty and quick to make.
So many time, we realize that the time to make cards are far apart. Well, don’t let that stop you from making your beautiful Christmas card. The card that I am sharing today is exquisite but simple to make, and the best part is super quick.
It is not stamping on this card front. Just die-cut and emboss, then assemble BOOM; it is done. The only part I stamp is the greeting inside and the trees to bring the festivity inside the card. Trust me; this card is quick to create.
Upcoming Sale

This coming week Tuesday, November 16, to Thursday, November 18, 2021. The perfect sale to stock up on paper, ink pads, and adding to your die collection.
- The discount includes 10% off cardstock, 15% off ink pads (excluding ink pad bundles and third-party pads), and 20% off dies.
- The discount applies to products featured in the 2021–2022 Annual Catalog only. Products from the July–December 2021 Mini Catalog are not included
I have a printable inventory sheet for you. Just click on the image below and print the inventory sheet. Then, take the inventory and be ready to order paper and ink that you are short of and take advantage of the discount.

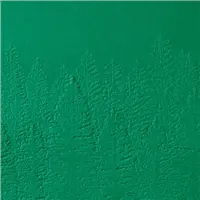
Close Up View Of the Embossed Foil

That Evergreen Forest Embossed on the green foil is very festive, plus that red foil frame adds that pizzazz touch to the finished card.
Inside Stamping With Evergreen Elegance

Inside, the greeting is stamped with Real Red ink, and the trees using Shaded Spruce. The traditional color for Christmas colors.
Measurements:
- Basic White 5 ½ x 8 ½ score at 4 ¼ card base
- Red Foil 5 ½ x 4
- Green Foil 4 ⅝ x 3 ⅜
Instructions:
- Die Cut the large scallop frame out of the Red Foil.
- In the center of the Red Foil Scallop frame, die-cut the stitched rectangle 4 ⅜ x 3
- Emboss the Green Foil using the Evergreen Forest Folder.
- Adhere the embossed green foil in the back of the opening of the red foil frame.
- Adhere to card front using dimensionals.
- Using glue dots, adhere the Wonderful Snowflake to the left-hand side of the embossed green foil.
- Make a bow out of the White Glittered ribbon and adhere in the center of the snowflake.
- Inside, stamp the greeting using Real Red ink and the trees using Shaded Spruce ink (ink once and stamp the trees 3 times).
Supplies for today project
To purchase or view all of the supplies used for today’s project, click on the images below ↓Click add all to cart.
Although don’t forget to EDIT your cart as needed, then if you need additional items, click continue shopping. In conclusion, you can edit the shopping cart at any time while you are shopping.


Customer Appreciation
 Orders of $40.00 or more before tax and shipping placed on my online store with Hostess Code X3WBDN3K will qualify for this month’s project download.
This month’s PDF download includes 6 unique cards and three boxes. Also, all measurements, step-by-step instructions, supplies list, individual pictures are included in the download.
Frenchie’s Design Team designs the PDF.
After placing a qualified order, you’ll receive the download by email in less than 48 hours. CLICK HERE to shop with me.
If your order is over $150, in this case, DO NOT enter the hostess code. You will get all the stamping rewards, and I will send you the PDF by email.
Not to forget about my “Frequent Buyer Rewards Program” so you may want to track your purchase and earn a free stamp set of your choice, or Sponge Dauber Case and more choices. For all detail and track sheet, CLICK HERE. You are responsible for tracking your purchase.

Never miss the latest news.
Subscribe to receive newsletter and blog posts delivered in your inbox.
Till next time Happy Stamping!

Meanwhile, the greatest compliment you can give me is a referral to a friend. I really appreciate any help you can provide.


