
Hello, Stampers,
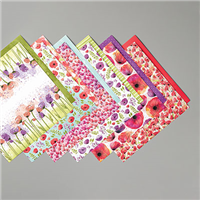
Many ask for fun fold cards well I have a fun one for you all today. Double Point Fold with the beautiful Peaceful Poppies designer paper. It looks tricky but it sure is simple.
You can view the video below in this post or on my YouTube Channel.

How to add the element to decorate the front.
I did a few dozen of these cards and I decorated them with many elements. Here is the list of the elements.
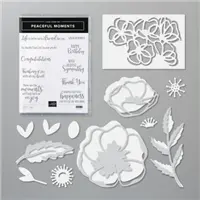
- Die-cut the poppies from the die set Poppy Moments die
- Peaceful Poppies Elements (I love these so pretty and quick to adhere)
- The big circle with the circle around that is the die from Painted Labels.
The listed all the supplies for all the cards at the bottom. Note that you do NOT need all that I listed you can pick and choose the one you prefer. I am just giving you so option to decorate it. All match so well with the Peaceful Moments designer paper.

Measurements
I did many of them and switch the color so I will list the different colors in parentheses.
- Card base 5½ x 4¼ (blackberry bliss or old olive)
- Inside layer 5¼ x 4 (pool party or whisper white)
- Peaceful Poppies designer paper 2 of 3 x 4 score at 1″ and diagonal at 2″, 2 of 5¼ x ¼, 2 of 2 x 4 *only if you wish to cover the inside point.
- Stitched Nested Labels 4-7/8 x 2-5/8 and 4¼ x 2¼ (Blackberry bliss and pool party or poppy parade and old olive) Note that a few I used one size smaller of the labels but after all done I prefer this size.
- If die-cut the flowers leaves you will need a scrap of the poppy parade, blackberry bliss, and old olive.

This is such a faux illusion. Looking at the card below it looks so complicated with the 2 strips on each side. It sure look like it is part of the flap. OH, how two little strips of 5¼ x ¼ can make a big difference on a card.
Save those little strips and scrap they come in handy for these cards. 
With or whit out inside cover for the point

As mention in the video you can cover or NOT cover the inside point, it’s all up to you. This is the 2 x 4 piece of designer paper you would need if you want to cove where the paper is folded.

Here you can view the difference. Top card the extra piece cover the folder point. Below I did not use the extra piece so you can see the fold. All is explained in the video on how to cut the paper to have the print facing the right direction. Again this part is optional.

How-to video
Supplies
You can purchase all of the supplies used 3 cards by clicking on the product images below (You do not need all, just different option for the decoration)
Or you can click ADD ALL to Cart, this will add all the supplies to your shopping cart. Then you can remove the items you do not need. The ADD ALL to Cart Option makes it easier and you will not have to go back and forth to my page. Don’t forget to EDIT your cart as needed. If you need additional items, you can also click continue shopping and add them to your order as well.
Thank YOU for your support and business.


Customer Appreciation
 All orders of $40.00 or more before tax and shipping placed on my online store with Hostess Code PRVAQWKW will be qualified for this month’s projects download. The PDF’s are design by Frenchie’s Design Team. Order of $40 or more before tax and shipping with the hostess code you will receive the PDF by email.
This month’s PDF includes 7 cards. The theme is Spring Time.
PDF includes all measurement, step by step instruction, supplies list, individual pictures.
All qualified orders will receive the download by e-mail in less than 48 hrs, from the time the qualified order is place.
CLICK HERE to shop with me.
If your order is over $150 DO NOT enter the hostess code, you will receive all the stamping rewards and I will send you the PDF by email.
Have a lovely day!


Thank you for posting every day. It gives us stampers something to look forward to in this mixed up world.
Beautiful cards! I have never made this type of card before and can’t wait to try! Thanks for sharing.
In your measurements – Peaceful Poppies designer paper 2 of 2 x 4 score at 1″. According to your video that sould be 2 of 3 x 4 score at 1″