
Hello Friends,
More fun with the Pigment Sprinkles and today I will share how to make a Faux Frame. I love these pigment sprinkle. They are vibrant in color plus they are the Stampin’Up! colors.
I have the how to video below in this post or you can view on my You Tube Channel.

Step by step for the faux frame
- Placing a piece of watercolor paper onto grid paper.
- Using painter tape (some call it blue tap or frog tap), secure your piece of watercolor paper onto the grid paper. Adhere the tape following the lines on the grid paper to cover the same portion on all side. Cover portion of the side of the watercolor paper. I cover ½” all around. I show the how to in the video. (painter tap can be find at hardware store, place that sell paint and such)
- Using the Spritzer filed with water, spritz the watercolor paper to cover the surface of the paper. Or you can use the aqua painter to cover the paper with water.
- Sprinkle the pigment sprinkles onto the wet paper. You can use as many color that you wish.
- Blend with the aqua paint that is filed with water.
- LET DRY
- After it is dry stamp your image. I used the Staparatus to stamp a few time to get a deep image.
- Remove the painter tap. I have great tip in the video on how to remove the tape without tearing the paper.
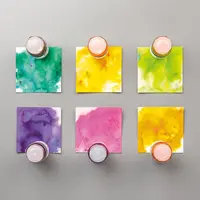
Color of Pigment Sprinkles
Top card I use the Bermuda Bay, Green Granny Apple and Daffodil Delight. Bottom Card is Daffodil Delight, Gorgeous Grape and Melon Mambo.
To keep the color vibrant I suggest to be careful when you sprinkle the pigment sprinkles, do not to overlap the crystal. You do not need lots of the sprinkle, it will blend.

Measurements
Both cards are the same measurement. Just different color of cardstock.
- Card Base 8½ x 5½ score at 4¼ Bermuda Bay or Melon Mambo
- First layer 5¼ x 4, Basic Black or Gorgeous Grape
- Watercolor paper 5 x 3¾
- Whisper White 5¼ x a inside piece


Before I let you go I have one more tip. Many say that they have a big mess when trying the pigment sprinkle. Well my best tip is use less sprinkle and do not over layer the crystal. Also after you blend them and let dry DO NOT judge your work till you stamp your image. Stamping the image make such a huge difference. So stamp your image and then see the result.
A great example is the one that I did in the video. It sure look blahhh in the video but the finish card is dang cute!
How to video
Supplies
You can purchase all of the supplies I used for today project by clicking on the product image below ↓ Thank YOU for your support and business.


Redeem Coupon
If you earn coupon last month, don’t forget to redeem them. Where to redeem them when shopping online click shopping bag and at the bottom right you will see the box “manage coupon” to click.
Save the date

Save the date. September 4th at 6:30 PM mountain time Holly and I will be live for the walk through of the Holiday catalog. That is the day that we can start ordering for the Holiday catalog.
Customer Appreciation
 All order of $50.00 or more before tax and shipping place on my online store with Hostess Code KEUZBSEZ will qualified for this month projects download.
The PDF’s are design by Frenchie’s Team and the Passport Pals.
If your order is between $40 to $49 and you enter the hostess code you will received only one PDF, the one design by Frenchie’s Team.
This month PDF include 13 cards and one apple box.
PDF include all measurement, instruction, supplies list, individual pictures.
All qualified order will receive the download by e-mail in less then 48 from the time the qualified order is place. CLICK HERE to shop.
If your order is over $150 DO NOT enter the hostess code and you will get all the stamping rewards and I will send you both PDF.
Have a lovely day!


