Hello Friends,
How to mail cards with embellishments. Did you ever received a card in the mail with embellishments like pearls, rhinestones and such and it was all poking out of the envelops? Well if you answer yes I have some great tips for you in today video.
The video can be found on my You Tube Channel or below in this post.
How to protect your embellishments in the mail
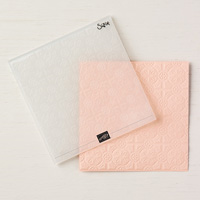
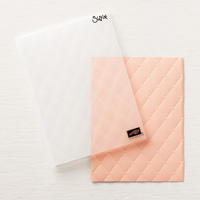
This is a little tricky to take picture to show but it is simple and quick. Just take a piece of card stock the size of your card, most card that I do are 5½ x 4¼. Emboss the cardstock with a deep embossing folder. Place on top of your card and slide in your envelope facing the back of the envelop. Why the back of the envelope, the main reason for this is at the post office the cards goes in a machine to read the address face up so it much friendlier to have a flat and smooth surface for the machine 🙂
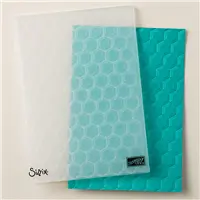
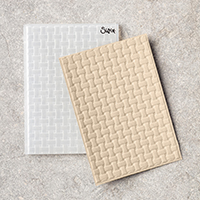
I listed at the bottom my favorite embossing folder to protect the embellishment. The deeper the better and make sure it is a full imprint on the embossing not just the center or the out line.
Here you can see how I slide it in the envelop. Yes the front of the card face the back of the envelop.
Do I need extra postage?
That is a tricky question but I have a few tips for you. All depend on the weight and the thickness. For the thickness if your card that is in the envelop slide smooth in between your paper trimmer where the blade slide then you are good for the thickness. You shouldn’t need extra postage the only exception would be if you have something that is very heavy but if it slide smooth I never had to add extra postage. If it din’t slide then I use the stamp that is for NON Machinable surcharge they are 70 or 71 cent and a reg stamp is 50 cent this is for the USA ONLY.
Tip Video
It is only 5 minutes video with many great tips.
My choices of embossing folder
Here are my favorite choice of embossing folder to use with cardstock to protect embellishments in the mail. Also the paper trimmer for the perfect guide to check the thickness of your card to see if you need extra postage. To order just click on the folder. Thank YOU so much for your support.
Customer Appreciation.
All order of $50.00 or more before tax and shipping place on my online store with Hostess Code J7QCGU3G will qualified for this month projects download. The PDF’s are design by Frenchie’s Team and the Passport Pals. If your order is between $40 to $49 and you enter the hostess code you will received one PDF only, the one design by Frenchie’s Team. This month PDF include 6 Gift card holders, 4 cards, 6 of 3 x 3 Note Cards and 6 Christmas Tags. PDF include all measurement, instruction, supplies list, individual pictures.
All qualified order will receive the download by e-mail. CLICK HERE to shop with me.
If your order is over $150 DO NOT enter the hostess code and you will get all the stamping rewards and I will send you both PDF.
Passport Pals team.
In the USA CLICK HERE to shop with me.
Have a lovely day!




Your tip to use an embossed piece of card stock is a great idea. I’ve just cut regular printer paper a tad bit smaller than the actual card, folded in half. Just like another card, however it’s thin printer paper. That seems to work for me. I haven’t had anyone receiving their cards tell me that doesn’t work. I see how that thin foam, which I do have plenty that I’ve saved, will scrunch up & not work well, as you show in your video.
I always put scotch tape on the outside of the envelope where the embellishments are pushing against the inside .It is a cheap and easy solution.
I use tape also, seems to work.
Me Too. Works great!
Thanks for the tips. I will use embossing cardstock with the card to mail out. I haven’t thought about paper trimmer between blade slide for letters to go thru. Good idea.
Terrific idea. Thank you muchly. Marcy Trouland
Great tips!
Great tip !! I have turned the cards inside out to keep the front of the envelope flat.
Great idea to embossing the liner! I buy poster board on sale four for $1 & cut a bit smaller than my card. Then just place over the card front, place in envelope facing the back & use reg postage. No problems in over 10 yrs. Saves my cardstock!
Thank you for this great info.
Great idea, thanks for sharing!
Thank you for the tip Frenchie. I have put cardstock in before but did not think to emboss it. Love your tip to slide it under the paper trimmer. Tfs
great tip~! Thank you so much for sharing!
Genius! Thanks so much for sharing this ?
Thankyou for your tips Frenchie. I’ll give both a try. Thanks for sharing.
Thanks you so much for your tip, after watching your video everything made more sense to me.
I just subscribed to your site and shared your video, what an incredibly brilliant idea!! Thank you so much!
Paper pumpkin and new ideas for making cards
All I have been doing is writing “Hand Cancel{ on the front of the envelope and taking it to the post office and they stamp it then and there. However, it does cost .71 cents for each one. Since I live in a small town it has been easier for me to do it this way but I will try the embossed method and see how it goes. Thanks for the tip. We need all the help we can get!
Thanks for the tips. I usually try to cut several sheets of cardstock at a time so it is ready when I am ready to send a card. I also try to coordinate the cardstock piece to the card that I am sending
I have always used clear packing tape and put it on the envelope where bulky embellishments were It protects it from pushing out of the envelope. Never had a problem
Great tips … thanks!
All great ideas! I never thought of embossing my protective cardstock. If it helps, it’s worth a try.
But, unless my SU Paper Trimmer is of a different dimension, the space on your paper trimmer where the blade slides is smaller than what the post office allows. I have one of the measurement boards that the PO uses and the measurement allowed is 1/4”.
I live in Southern California, if the post office can feel the embellishments, even 1, they will charge you as a small package I don’t care how thin and light the envelope is. The stock card works as long as it’s smooth!
Lovely work
I passed my envelope through the opening on my paper trimmer as you show but when I got to the post office, it did not fit through their letter slot so I ended up paying $2.00 instead of a regular stamp. But that may be only here in Canada . So, you may want to inform yourself at the post office.
As mention in my post this is based in the USA
I put the fine bubble wrap like from a plastic Amazon wrapper on the embellished side of the card. I’ve never had a problem with postage as long as the card is not too thick.
WONDERFUL TIP! I HAVE MADE OVER 7,000 CARDS FOR LOCAL CARE FACILITIES AND OUR HOSPITAL NURSES… SINCE JUNE 2020… I CANNOT HAVE THE COVID SHOT AS I AM ALLERGIC TO THE FLU SHOT… SO AM KEEPING BUSY AT HOME… THE CARDS ARE ONE OF THE WAYS. THIS TIP WAS JUST AT THE RIGHT TIME AS A CARD I SENT WAS RETURNED TO ME AND THE RHINESTONE WAS POKING OUR THRU THE ADDRESS.. SO NOW I KNOW HOW TO PREVENT THAT! THANK YOU SO MUCH!
I notice that if I leave the envelope in my mailbox and the postman takes it, then there is no extra postage. Maybe he doesn’t want to fool around with it.
If I take it to the postoffice, they always charge extra.